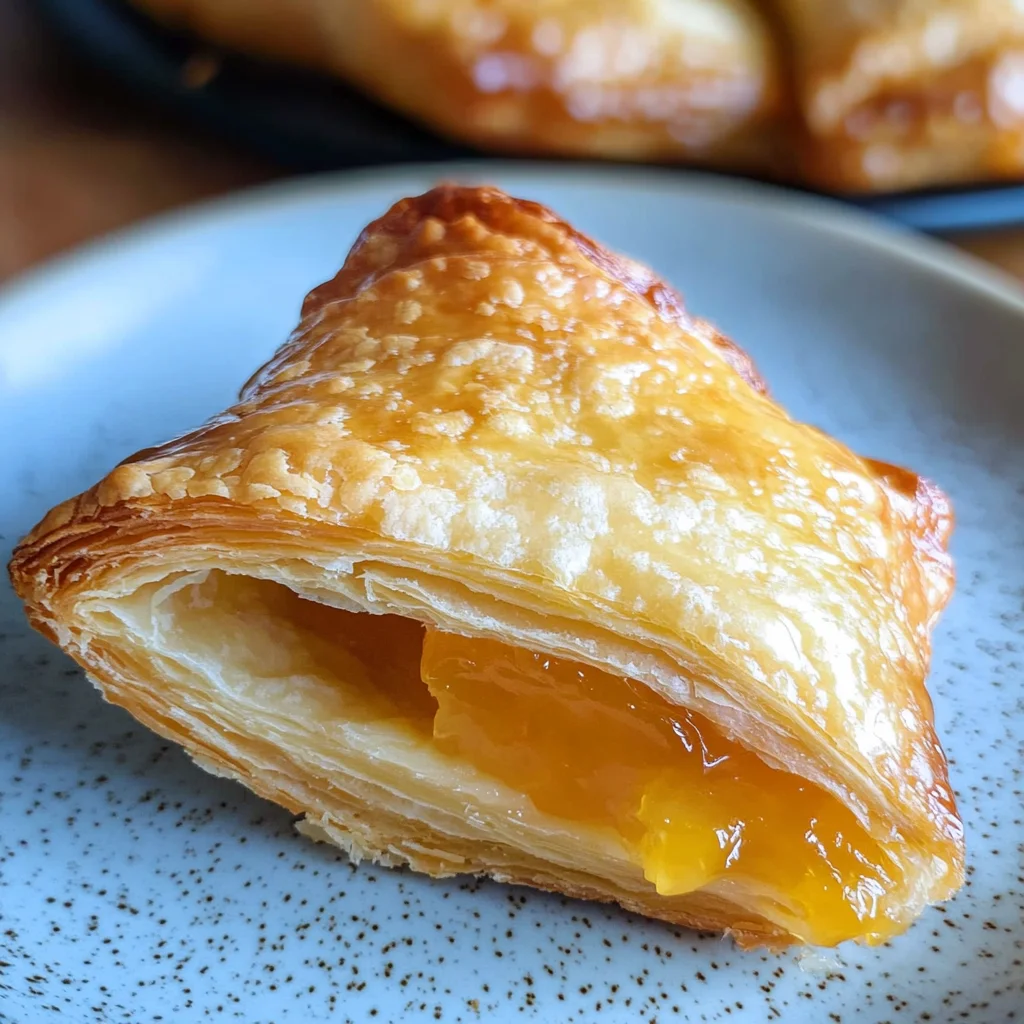
Flaky Gluten Free Pastries
If you love flaky gluten free pastries, this delightful recipe is perfect for you. Not only are these pastries a treat for breakfast, but they can also be enjoyed for snacks or dessert. With their light and crispy texture, they can be filled with your favorite fillings such as jam, Nutella, or pastry cream. Perfect for any occasion, these flaky gluten free pastries will surely impress family and friends.
Why You’ll Love This Recipe
- Easy to Make: This recipe simplifies the process of creating delicious pastries without any gluten.
- Versatile Fillings: You can customize the pastries with sweet or savory fillings to suit your taste.
- Perfect for Any Occasion: Whether it’s a brunch gathering or an afternoon tea, these pastries fit right in.
- Flaky Texture: The lamination process ensures that each bite is light and flaky, just like traditional French pastries.
- Kid-Friendly: These pastries are fun to make with kids—everyone can pick their favorite filling!
Tools and Preparation
To make flaky gluten free pastries, you’ll need some essential tools and equipment to ensure success.
Essential Tools and Equipment
- Mixing bowl
- Rolling pin
- Silicone mat
- Sharp knife
- Plastic wrap
- Baking sheet
Importance of Each Tool
- Mixing bowl: A spacious bowl allows you to blend ingredients easily without spills.
- Rolling pin: This tool is crucial for rolling out the dough evenly to achieve that perfect thickness.
- Silicone mat: Prevents sticking and makes it easy to roll out dough without adding too much flour.
Ingredients
- 2 1/2 cup gluten free flour blend ( see note!)
- 1/4 cup cane sugar
- 1/8 teaspoon salt
- 3/4-1 cup cold water (Use purified water.)
- 1/2 cup unsalted COLD butter (COLD)
- 1 small egg (for the egg wash)
- Use any filling you like, including jam, Nutella, etc.
How to Make Flaky Gluten Free Pastries
Step 1: Combine Dry Ingredients
Add 2 1/2 cup gluten free flour blend, 1/4 cup cane sugar, and 1/8 teaspoon salt to a large mixing bowl and whisk until blended.
Step 2: Mix in Wet Ingredients
Pour in 3/4-1 cup cold water into the dry mixture. Stir well before adding the cold chunks of butter. Use a fork or your hands to mix until the dough forms with big butter lumps.
Step 3: Chill the Dough
Wrap the dough in plastic wrap and refrigerate it for 30-45 minutes. This step is essential for a successful lamination process.
Step 4: Laminate the Dough
Place the dough on a gluten-free flour-dusted silicone mat. Roll it out to a thickness of about 1/4 inch. Perform an envelope fold by folding one side over past the middle before folding the other end over it.
Step 5: Repeat Laminating Process
Continue this rolling and folding technique six more times. This creates thin layers of butter within your dough that result in flakiness when baked.
Step 6: Final Dough Preparation
After laminating six times, remove from the refrigerator. Dust your surface again with flour and roll out to a thickness of about 1/4 inch. Cut into rectangles without dragging your knife.
Step 7: Add Filling
Cut shapes as desired and add fillings like jam or chocolate in the center of each piece.
Step 8: Preheat Oven & Freeze Pastries
Preheat your oven to 425º F and place the filled pastries in the freezer for about 15 minutes before baking.
Step 9: Egg Wash & Bake
Remove from freezer and brush each pastry with egg wash. Bake for about 15-20 minutes until golden brown; adjust temperature if needed.
Step 10: Cool Before Serving
Once baked, let them cool on a rack before serving. Be cautious as fillings may be hot!
How to Serve Flaky Gluten Free Pastries
Flaky gluten free pastries are incredibly versatile and can be served in numerous delightful ways. Whether you enjoy them for breakfast or dessert, there’s a serving suggestion for every occasion.
With Fresh Fruit
- Pair your flaky gluten free pastries with a side of fresh fruit for a colorful and healthy addition. Seasonal fruits like berries, peaches, or apples complement the sweetness of the pastries.
As an Afternoon Snack
- Enjoy these pastries as a light afternoon snack. A cup of tea or coffee enhances the experience, making it perfect for a cozy break in your day.
Filled with Cream
- For a decadent treat, fill your flaky gluten free pastries with whipped cream or pastry cream. This adds richness and pairs beautifully with fruity fillings.
Drizzled with Glaze
- A simple glaze made from powdered sugar and milk can take your pastries to the next level. Just drizzle it on top after baking for an extra touch of sweetness.
Served Warm
- Serving the pastries warm allows the filling to be gooey and delicious. Just remember to let them cool slightly before biting into them!
How to Perfect Flaky Gluten Free Pastries
Creating perfectly flaky gluten free pastries is an art that can be mastered with a few simple techniques. Follow these tips for the best results.
-
Use Cold Ingredients: Keeping all ingredients cold helps create distinct layers in the pastry, leading to that desired flakiness.
-
Don’t Overwork the Dough: Handle the dough gently and avoid overmixing, which can lead to tough pastries rather than flaky ones.
-
Chill Between Rolls: Refrigerating the dough between laminations prevents it from becoming too soft and ensures better layering.
-
Dust Surfaces Generously: Use gluten-free flour when rolling out your dough to prevent sticking and maintain structure during shaping.
-
Monitor Oven Temperature: Keep an eye on your oven temperature; starting at high heat helps create steam that contributes to flakiness.
Best Side Dishes for Flaky Gluten Free Pastries
Flaky gluten free pastries pair well with various side dishes that enhance their flavors while maintaining a balanced meal. Here are some excellent options:
-
Citrus Salad: A refreshing mix of citrus fruits provides brightness that complements sweet pastries beautifully.
-
Yogurt Parfait: Layer yogurt with granola and fruit for a creamy and crunchy side that contrasts nicely with flaky textures.
-
Vegetable Soup: A warm bowl of vegetable soup makes for a comforting pairing, adding heartiness alongside your delicate pastries.
-
Cheese Platter: Offering a variety of cheeses adds savory elements to balance the sweetness of the pastries; include nuts for crunch.
-
Herbed Quinoa Salad: This light dish brings freshness and herbs that enhance the overall flavor profile without overwhelming.
-
Chocolate Dipping Sauce: For those who love indulgence, serve melted chocolate as a dip for a rich experience alongside your pastries.
-
Berries Compote: A warm berry compote drizzled over flaky gluten free pastries elevates them into dessert territory, perfect for gatherings.
-
Savory Spinach Dip: Pairing with a savory dip offers contrast; consider serving with crunchy veggie sticks or gluten-free crackers.
Common Mistakes to Avoid
Making flaky gluten free pastries can be tricky, but avoiding common mistakes will help you achieve perfect results.
- Ignoring the temperature: Butter needs to be cold to create flaky layers. Always use chilled butter and keep your dough cold during preparation.
- Using the wrong flour blend: Not all gluten free flour blends are created equal. Choose a blend suitable for pastries, ideally one that contains xanthan gum for better texture.
- Overworking the dough: Mixing too much can develop the proteins in the flour, leading to tougher pastries. Handle the dough gently and only until it comes together.
- Skipping refrigeration time: Allowing your dough to chill is crucial for proper lamination. Don’t rush this step; let it rest in the fridge as directed.
- Cutting with a dragging motion: When cutting the pastry, use a sharp knife and cut straight down. Dragging can seal edges and reduce flakiness.

Storage & Reheating Instructions
Refrigerator Storage
- Store flaky gluten free pastries in an airtight container.
- They will stay fresh for up to 3 days in the refrigerator.
Freezing Flaky Gluten Free Pastries
- Wrap pastries individually in plastic wrap before placing them in a freezer-safe bag.
- You can freeze them for up to 3 months without losing quality.
Reheating Flaky Gluten Free Pastries
- Oven: Preheat your oven to 350º F and reheat for about 10-15 minutes until warmed through.
- Microwave: Heat on medium power for about 30 seconds, checking frequently to avoid sogginess.
- Stovetop: Place on a skillet over low heat, covering it to warm evenly without drying out.
Frequently Asked Questions
Here are some common questions regarding flaky gluten free pastries.
How do I make my flaky gluten free pastries more flavorful?
Adding spices or zest from citrus fruits can enhance flavor. Experiment with vanilla or almond extracts for added depth.
Can I use dairy-free butter for flaky gluten free pastries?
Yes, dairy-free butter works well. Just ensure it’s cold when you mix it into your dough for optimal flakiness.
What fillings work best for flaky gluten free pastries?
You can use fruit jams, chocolate spreads, or even savory fillings like cheese. The options are endless!
How do I know when my pastries are done baking?
Look for a golden-brown color on the edges and a light puffiness. They should feel firm but not hard to touch.
Can I customize my flaky gluten free pastries?
Absolutely! Change the fillings or shapes according to your preferences. Get creative with flavors!
Final Thoughts
Flaky gluten free pastries are not only delicious but also versatile. Whether filled with sweet jams or rich chocolate, they make a delightful treat any time of day. Don’t hesitate to customize these pastries based on your taste preferences!
Flaky Gluten Free Pastries

Flaky gluten free pastries are a delightful treat that can be enjoyed any time of day. With their light, crispy texture and endless filling options—ranging from sweet jams to rich chocolate—they’re perfect for breakfast, snacks, or dessert. This easy recipe simplifies the pastry-making process, ensuring you can create impressive pastries without the hassle of gluten. The lamination technique provides that classic flaky bite, making these pastries a favorite for family gatherings or casual brunches. Customize them to your liking and watch as they quickly become a cherished staple in your kitchen.
- Prep Time: 15 minutes
- Cook Time: 20 minutes
- Total Time: 35 minutes
- Yield: Approximately 12 pastries 1x
- Category: Dessert
- Method: Baking
- Cuisine: Gluten Free
Ingredients
- 2 1/2 cups gluten free flour blend
- 1/4 cup cane sugar
- 1/8 teaspoon salt
- 3/4–1 cup cold purified water
- 1/2 cup unsalted cold butter
- 1 small egg (for egg wash)
- Your choice of fillings (jam, Nutella, pastry cream)
Instructions
- In a mixing bowl, whisk together gluten free flour blend, cane sugar, and salt.
- Gradually add cold water and mix until the dough forms with visible butter lumps.
- Wrap the dough in plastic wrap and refrigerate for 30-45 minutes.
- Roll out the chilled dough on a floured surface to about 1/4 inch thick and perform an envelope fold.
- Repeat the rolling and folding process six more times for optimal flakiness.
- Cut into desired shapes, fill with chosen fillings, and freeze for 15 minutes.
- Preheat oven to 425º F; brush pastries with egg wash and bake for 15-20 minutes until golden brown.
Nutrition
- Serving Size: 1 pastry (50g)
- Calories: 175
- Sugar: 3g
- Sodium: 120mg
- Fat: 10g
- Saturated Fat: 6g
- Unsaturated Fat: 4g
- Trans Fat: 0g
- Carbohydrates: 18g
- Fiber: 1g
- Protein: 2g
- Cholesterol: 20mg